A Guide to Doors Speaker Installation

How to Install Component Speakers into Your Car.

A tutorial by FHRX Studios – Sydney, Australia.

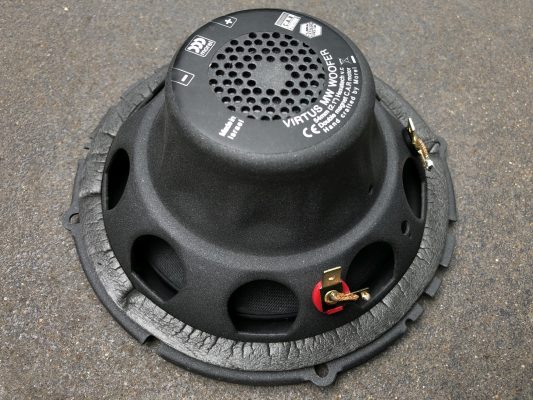
When it comes to installing speakers into your car you’ll approach the task in a different way dependant on how big a fan of music you are. If you care little for your music, or car for that matter; then by all means have old mate the mechanic liberally throw your new speakers in and away you go. However if you’re somewhat of an aficionado having taken the time and effort to purchase a serious high-end brand such as Morel then you owe it to yourself and the product to have them installed correctly. Whether you undertake this task or have an audio store do it will depend on how confident you are on the tools, nonetheless if you’d like to have a go yourself then this tutorial has been written especially for you. For it covers in detail how to install a set of component speakers into your car.

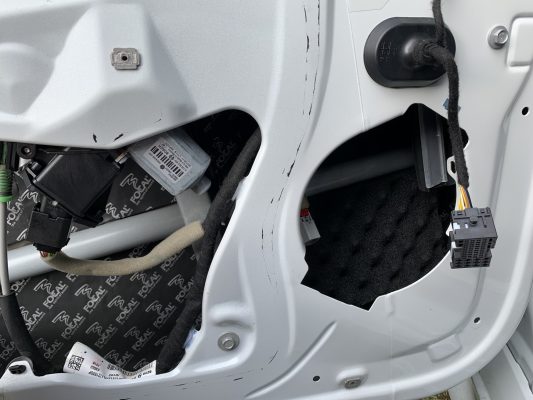
Just as an aside this tutorial covers a two-way component set. However if your car has a three-way component set installed from factory then the procedure for the extra smaller midrange is exactly the same as the larger one. Wisdom also dictates that before you start unpacking your new speakers you perform one final measure to double check your maximum mounting depth, not just behind the driver but in front of it too. Lest you find the speaker surround impacting upon the door trim at high volumes, or the magnet fouling upon the window and its associated mechanisms.

Step one – Preparation and protection.

The first step of your installation involves simply preparing the door. This means first masking up the door with painters tape. Mask along all edges, mask around any points you’re going to be prying against and mask any other places that run the risk of getting marked or scuffed during the installation. Remember to take photos of all screws, plugs and their locations as you set about dismantling the door.

Step two – Stripping and cleaning.

After you’ve removed the door trims put them in a safe place. A safe place is not leaning against the car where the slightest zephyr will see them landing face down on your driveway. With the trims safely stored away you then remove the plastic splash guard and begin cleaning the door proper with wax & grease remover. Clean both the inner and outer skins, removing all debris, dust and sealant.

Step three – Deaden the outer skin.

Apply sound deadening to the entire outer skin. We usually start by making two or three larger strips and then use the offcuts to get to all those little nooks and crannies. However make sure you don’t block the water drain holes along the bottom of the door. As for how much deadening; the more the better, within reason though. See all mechanical things have a resonant frequency, a frequency at which point they exacerbate and amplify said frequency. By adding additional weight to your door panels you’re lowering that frequency to such a point where by it’ll be unaffected by the frequencies being reproduced by your midrange. Now we’re only talking about sound quality here; if you want to see some more extreme examples of how nasty resonance and oscillations can get, check out this clip of the Tacoma Narrows bridge or this clip of a CH-47 Chinook ground resonance test.

Step four – Install diffusion tiles.

It’s important to add a large diffusion tile directly behind the midrange speaker. When talking standing waves; the lower the frequency the longer the wavelength. This means that no matter how much money you’ve spent on your speakers; somewhere within the midbass region there will be a frequency where the sound wave hits the outer skin and reflects back upon itself, effectively cancelling the next cycle. The diffusion tile prevents from occurring. You’ll notice it’s for this very reason that movie cinemas right through to sound studios have their walls liberally covered with curtains, carpet tiles and other absorptive materials.

Step five – Upgrade the cables.

Having sufficiently sized cables constructed from quality materials such as silver or copper is critical for supplying adequate current to your speakers without running the risk of overheating. Do take note of the term adequate current though; for 99% of the time the OEM cables run in modern cars will be of sufficient size and material for carrying the current you require. However if you’re looking to run triple digits of watts continuously to each speaker then you’re going to need larger gauge cables in place. Run these larger aftermarket cables through the loom tubes into the doors, don’t drill any new holes. If you have particularly challenging door loom plugs you may have to remove the door from the car altogether to achieve this.

Step six – Deaden the inner skin.

Apply deadening to the inner skin and carefully remove any air bubbles. Make sure you leave plenty of clearance for moving parts such as door handle and lock control rods. Cut out small circular sections where the OEM wiring loom clips attach, do the same for the door trim plugs in order to allow them to get plenty of purchase when you pop the door trims back on. Geometry says you’re going to have a split or two in the deadening somewhere; upon these areas you simply place a panel of thin foam. When cutting the speaker hole out ensure you leave a little deadening around the top edge to act as protection against water when it cascades down during heavy rain.

Step seven – Baffling stuff.

These days there are many baffles available to suit a large number of vehicles. However if you cannot find a set to suit your particular ride simply construct new baffles in a similar shape to the factory ones. These must locate through the original holes in order to avoid drilling any new ones thus damaging the door. In doing this you not only keep your insurer happy; you can also return the car completely back to factory if you choose to sell it in the future. Our boutique baffles are usually constructed from timber however we have made plenty from Perspex and even 6061 alloy, dependant on just how robust they’re required to be. If made from timber though they should be coated with polyester resin to weatherproof them and then painted black to prevent them being seen through the factory grilles.

Step eight – Install and seal the baffles.

Secure the baffles onto the door using the factory holes. If they’re threaded holes rather than screw holes ensure you use fasteners with matching threads. For example it’s important to remember if you have an American car there’s a good chance the thread will be imperial not metric. Once they’re secure you seal them onto the deadening with flexible black silicone sealant to prevent potential air leaks during operation.

Step nine – A little unseen housekeeping.

If at all possible, use a vehicle specific speaker plug adaptor to avoid cutting the OEM plug off the end of the factory speaker cables. Also make sure that you tie the speaker wires runs down inside the confines of the door to prevent any chance of them being snagged on the window mechanism as it operates throughout its normal range of motion.

Step ten – Solder the terminals.

Strip back about 5mm of the speaker cable sheath and tin the end generously. Then deposit a generous dollop of solder onto the speaker terminal.Bring the two together to create a rock solid bond. Generally speaking we recommend against using crimp terminals, because their two best traits are corroding thence creating resistance and falling off at the most inopportune time.

Step eleven – Heat shrink the terminals.

Heat shrink the terminals with double wall heat shrink rather than simply wrapping them with plain electrical tape. For the heat shrink will conform to the shape and it cools and solidifies, meaning it cannot fall off after a few months. This heat shrink not only protects the terminals from the elements, it also serves to prevent any potential for arcing at high power. We usually heat shrink the terminals red and black for positive and negative respectively.

Step twelve – Gasket the speakers.

Before you install the speakers make sure you install a gasket between them and the baffles. We use dedicated foam strip gasket material here but in reality you can use just about anything so long as it prevents any air escaping as the speaker creates those big compression waves. Remember the laws of physics care little for your speakers’ value, ergo running million dollar speakers without gaskets is akin to running a 10000hp top fuel motor without a head gasket.

Step thirteen – Select your fasteners.

With everything deadened, diffused, soldered and heat shrunk it’s now time to screw the speakers in. Before you do however make sure you get yourself some nylon washers to go between the screw head and the speaker frame. Many speaker frames these days employ magnetically inert materials like plastic or alloy, materials that tend to be intrinsically soft and hence possess little resistance against compression moments; in other words they gouge and scratch very easily. These washers protect the speakers from damage should you ever want to resell them.

Step fourteen – Install the speakers.

When installing the speakers go easy on the force. Remember you’re only trying to hold them in place and squash that foam gasket sufficiently. Don’t go berserk doing them up, and certainly don’t use a drill driver. Put your fingers around the screwdriver head to prevent any chance of slippage and tighten them in the same pattern you’d do a head gasket; directly across from one another. Don’t just go around in a circular motion because you’ll run the risk of warping the speaker frame by the time you arrive at the last fastener.

Step fifteen – Install the bandpass rings.

People often quiz us as to what role these thicker front foam rings play. Put simply they change the door configuration from an eighth-order bandpass to a fourth-order bandpass scenario. Putting it another way; they prevent the compression airwave from the front of the diaphragm escaping into the confines of your door trim and becoming trapped and hence redundant. They instead force the air directly out through the grille to you, meaning you not only get all your music with minimal echoic detractors; you also cop all the kinetic force from the midbass too.

Step sixteen – Install the tweeters.

When it comes to tweeters most have a sealed labyrinth / damping chamber on the back. This means they can be installed into the same location as the OEM tweeters without the need for aperiodic membranes, waveguides and the like. If you’re lucky they’ll lock into the factory tabs, however if not simply make up a cross bracket which then bolts into the factory locations. If this is not possible either because the OEM location resembles a three-dimensional topographical map, you can actually use thick foam padding to hold it in place; for tweeters intrinsically don’t vibrate much because of the high frequencies they’re outputting. Once the tweeters are in place we cover the entire affair with soft foam to protect it and prevent any possible rattles emanating from around the rear housing and metal portions of the car body behind it.

Step seventeen – One last eyeball.

Now before you reinstall the door trims run your eye over everything one last time to double check all the screw and plug holes have been located and that no deadening will be visible around the edges when the trim is back in position. Next plug everything back in and check all the fundamentals are working; things like central locking, door handles and power windows all function correctly and without fouling on anything. Finally check all the ancillary electrical buttons such as the omnidirectional power mirror controllers, seat positioning switches and the like. If that all checks out, you can then pop the trims back on. But don’t do them up fully just yet.

Step eighteen – Finish the job and relax.

Just before you perform the final tighten of the fasteners and click the screw covers back into place give the stereo a quick test to ensure everything is working. Check each speaker as individually as possible, running the balance from left to right and fader from front to back and so on. If everything is working without fuss then you’re good to lock everything down and finish up. You can then sit back, crack open a can of your favourite beverage and enjoy your new      found sound quality and bass.


Step nineteen – Conclusion and potential upgrades.

So there you go; that’s how to correctly install a set of Morel component speakers. If you’re a serious sound quality enthusiast though you might find yourself pining for superior staging, imaging, spectral balance and linearity. To achieve this level of aural perfection consider making a set of custom pillars to install your tweeters and midranges into. Because whilst the factory location is more than adequate in the majority of cases, especially if you’re running a processor; you will discover that OEM tweeter locations are not always optimal and that firing directly through OEM grilles can sometimes lend itself to azimuth and dispersion issues.

FHRX Studios is one dealer in our Sydney Morel dealer network, they have a reputation for a no compromise exacting standard of workmanship, Marty Price has written and reviewed product for numerous car audio and other magazines over the years and has been kind enough to allow Morel Australia to reproduce the aforementioned installation guide.

Installing audio into today’s modern vehicles is not always something that a person can DIY, for this reason we always recommend that you allow one of our professional Morel dealers to undertake the installation for you, you can find them listed by state under the Retailers tab in the top menu, it will be well worth the money spent.  This article is meant as a guide only it is not a definitive installation guide, if nothing else this guide should give you an understanding of just how much work is involved to do the job and the type of tools you may need to do this job correctly.